Wednesday, July 7, 2010

Struts2 : Token Session Interceptor

In case of multiple request using same session, this interceptor is capable to block all the subsequesnt requests, while the first request is being processed.

Here is the sample code:

index.jsp


<%@ page language="java" contentType="text/html; charset=ISO-8859-1"
pageEncoding="ISO-8859-1"%>

<%@ taglib prefix="s" uri="/struts-tags" %>
<!DOCTYPE html PUBLIC "-//W3C//DTD HTML 4.01 Transitional//EN" "http://www.w3.org/TR/html4/loose.dtd">
<html>
<head>
<meta http-equiv="Content-Type" content="text/html; charset=ISO-8859-1">
<title>Insert title here</title>
</head>
<body>
<s:form action="execActionAction" method="POST">
<s:textfield name="somestring"/>
<br>
<s:submit value="Enter"/>
<s:token />
</s:form>
</body>
</html>

result.jsp

<%@ page language="java" contentType="text/html; charset=ISO-8859-1"
pageEncoding="ISO-8859-1"%>
<%@ taglib prefix="s" uri="/struts-tags" %>
<!DOCTYPE html PUBLIC "-//W3C//DTD HTML 4.01 Transitional//EN" "http://www.w3.org/TR/html4/loose.dtd">
<html>
<head>
<meta http-equiv="Content-Type" content="text/html; charset=ISO-8859-1">
<title>Result</title>
</head>
<body>
<s:property value="somestring" />
<br>
</body>
</html>

Test.java

package com.Test;

import com.opensymphony.xwork2.ActionSupport;

public class Test extends ActionSupport{

private String somestring;

public String getSomestring() {
return somestring;
}

public void setSomestring(String somestring) {
this.somestring = somestring;
}


public String execute() throws Exception{

System.out.println("Printing Token-Session");

return SUCCESS;
}

}


struts.xml

<?xml version="1.0" encoding="UTF-8" ?>
<!DOCTYPE struts PUBLIC
"-//Apache Software Foundation//DTD Struts Configuration 2.0//EN"
"http://struts.apache.org/dtds/struts-2.0.dtd ">
<struts>

<include file="struts-default.xml" />
<package name="mypkgTest" extends="struts-default">

<action name="execActionAction" class="com.Test.Test">
<interceptor-ref name="basicStack" />
<interceptor-ref name="tokenSession" />


<result name="success">/result.jsp</result>
<result name="invalid.token">/index.jsp</result>

</action>

</package>
</struts>


web.xml

<?xml version="1.0" encoding="UTF-8"?>
<web-app xmlns:xsi="http://www.w3.org/2001/XMLSchema-instance" xmlns="http://java.sun.com/xml/ns/javaee" xmlns:web="http://java.sun.com/xml/ns/javaee/web-app_2_5.xsd" xsi:schemaLocation="http://java.sun.com/xml/ns/javaee http://java.sun.com/xml/ns/javaee/web-app_2_5.xsd" id="WebApp_ID" version="2.5">
<display-name>myBlankProject</display-name>

<filter>
<filter-name>struts2</filter-name>
<filter-class>org.apache.struts2.dispatcher.FilterDispatcher</filter-class>
</filter>

<filter-mapping>
<filter-name>struts2</filter-name>
<url-pattern>/*</url-pattern>
</filter-mapping>


<welcome-file-list>
<welcome-file>index.html</welcome-file>
<welcome-file>index.htm</welcome-file>
<welcome-file>index.jsp</welcome-file>
<welcome-file>default.html</welcome-file>
<welcome-file>default.htm</welcome-file>
<welcome-file>default.jsp</welcome-file>
</welcome-file-list>
</web-app>


The below form I've filled out with some text and pressed submit.


The result page displayed the string correctly.


In my Model (POJO) I've print another string on the console which is "Printing Token-Session". It is already there in the console as you can verify in the below screen shot.


Now, I've resubmit the form by pressing "Refresh" button on the browser. Now you can see that there is only one occurrence of the string "Printing Token Session" on the console even I've resubmitted the form and there will be an Warning stating that"Form token does not match the session token null.


So, this is the advantage of Token Session Interceptor, by which you can stop resubmitting of the form by the user.

Tuesday, July 6, 2010

Struts2 : Token Interceptor

It may happen that user double clicked on the submit button or back button, which may cause some side effects on the execution of the action class. This interceptor can make sure that back buttons and double clicks don't cause un-intended side affects. For example, you can use this to prevent careless users who might double click on a "checkout" button at an online store. This interceptor uses a fairly primitive technique for when an invalid token is found: it returns the result invalid.token, which can be mapped in your action configuration. A more complex implementation, TokenSessionStoreInterceptor, can provide much better logic for when invalid tokens are found.


Example:

index.jsp

Note: To set a token in your form, you should use the token tag. This tag is required and must be used in the forms that submit to actions protected by this interceptor. Any request that does not provide a token (using the token tag) will be processed as a request with an invalid token.


<%@ page language="java" contentType="text/html; charset=UTF-8"

pageEncoding="UTF-8"%>
<%@ taglib prefix="s" uri="/struts-tags" %>
<!DOCTYPE html PUBLIC "-//W3C//DTD HTML 4.01 Transitional//EN"
"http://www.w3.org/TR/html4/loose.dtd">

<html>
<head>
<meta http-equiv="Content-Type" content="text/html; charset=UTF-8">
<title>Insert title here</title>
</head>
<body>
<s:form action="AddEntry">
<s:textfield label="Name" name="name"/>
<s:textfield label="Address" name="address"/>
<s:textfield label="Phone Number" name="phoneNumber"/>
<s:submit value="ADD"/>
<s:token name="clientToken"></s:token>
</s:form>
</body>
</html>


success.jsp

<%@ page language="java" contentType="text/html; charset=UTF-8"

pageEncoding="UTF-8"%>
<%@ taglib prefix="s" uri="/struts-tags" %>
<!DOCTYPE html PUBLIC "-//W3C//DTD HTML 4.01 Transitional//EN"
"http://www.w3.org/TR/html4/loose.dtd">

<html>
<head>
<meta http-equiv="Content-Type" content="text/html; charset=UTF-8">
<title>Insert title here</title>
</head>
<body>
Name: <s:property value="name" />
<br>
Address: <s:property value="address" />
<br>
Phone: <s:property value="phoneNumber" />
</body>
</html>


AddEntry.java

package phoneBook;

import com.opensymphony.xwork2.ActionSupport;

public class AddEntry extends ActionSupport{

private static final long serialVersionUID = 1L;
private String name = null;


private String address = null;
private String phoneNumber = null;

public String getName() {
return name;
}

public void setName(String name) {
this.name = name;

}
public String getAddress() {
return address;

}
public void setAddress(String address) {
this.address = address;

}
public String getPhoneNumber() {
return phoneNumber;

}
public void setPhoneNumber(String phoneNumber) {
this.phoneNumber = phoneNumber;

}

public String execute() throws Exception{
System.out.println("Name\t\t:" +name);

System.out.println("Address\t\t:" +address);
System.out.println("Phone Number\t:" +phoneNumber);

return SUCCESS;
}
}


struts.xml

<!DOCTYPE struts PUBLIC

"-//Apache Software Foundation//DTD Struts Configuration 2.0//EN"
"http://struts.apache.org/dtds/struts-2.0.dtd">

<struts>
<package name="default" extends="struts-default">
<action name="AddEntry" class="phoneBook.AddEntry">
<interceptor-ref name="token" />
<interceptor-ref name="basicStack" />
<result name="success">/success.jsp</result>
<result name="invalid.token">/index.jsp</result>
</action>
</package>
</struts>


web.xml

<?xml version="1.0" encoding="UTF-8"?>

<web-app xmlns:xsi="http://www.w3.org/2001/XMLSchema-instance" xmlns="http://java.sun.com/xml/ns/javaee" xmlns:web="http://java.sun.com/xml/ns/javaee/web-app_2_5.xsd" xsi:schemaLocation="http://java.sun.com/xml/ns/javaee http://java.sun.com/xml/ns/javaee/web-app_2_5.xsd" id="WebApp_ID" version="2.5">
<display-name>MyBlankProj</display-name>

<filter>
<filter-name>struts2</filter-name>
<filter-class>org.apache.struts2.dispatcher.ng.filter.StrutsPrepareAndExecuteFilter</filter-class>
</filter>

<filter-mapping>
<filter-name>struts2</filter-name>
<url-pattern>/*</url-pattern>
</filter-mapping>

<welcome-file-list>
<welcome-file>index.html</welcome-file>
<welcome-file>index.htm</welcome-file>
<welcome-file>index.jsp</welcome-file>
<welcome-file>default.html</welcome-file>
<welcome-file>default.htm</welcome-file>
<welcome-file>default.jsp</welcome-file>
</welcome-file-list>
</web-app>

ok, the coding is over, now its time for test.......

Lets start our application by typing the url or by eclipse. The below page (index.jsp) would be displayed. I've filled-out the form as below. and pressed submit.


The result page would appear (success.jsp). The thing here to notice is I've written code to print in the console also. In eclipse you can see the result appeared in the console just like below.


It means it will again appear if I refresh the page (i.e., resubmit the page). Lets do it....

No, it will never happen, it will go to the index.jsp page without resubmitting the page. You can check the console after refreshing the page and there you will find that only one occurrence of the result is showing and there will be an Warning stating that "com.opensymphony.xwork2.util.logging.commons.CommonsLogger warn WARNING: Form token JVP8Z7FXG8UYSN0QMT6WZ3SOYT63QD5G does not match the session token null.".


So, this is the advantage of Token Interceptor, by which you can stop resubmitting of the form by the user.


Saturday, November 14, 2009

Ubuntu bug # 204133 - SOLVED

A week before, I upgraded my Ubuntu 9.04 to Ubuntu 9.10 (Karmic Koala). It was an amazing experience with it. The faster boot up speed, new login window and most importantly the new Software Center. Now the real problem started when I first shut down the PC. It freezes at a certain point in the process of Shut Down. The message was like this:

* Stopping MySQL database server mysqld

… done.

* Shutting down ALSA…

* Asking all remaining processes to terminate…

* Deconfiguring network interfaces…

* Deactivating swap

buffer i/o error on device loop0

I didn’t bother at all as it was for the first time. When it occurred regularly, then I thought it may be due to my HD, but when I googled, I saw it is a BUG!! There are many people with WUBI facing this problem but no definite fix on this.

From last night that problem is gone with a handy fix, which I want to share with you.

  1. Go to /etc/rc6.d/ directory
  2. You can find a file named “S40umountfs”.
  3. If you are not “root” change the permission for writing over it.
  4. Open the “S40umountfs” file in a text editor.
  5. Now you have to replace two lines with a two new lines.

a) Replace this line:

fstab-decode umount -f -r -d $WEAK_MTPTS

with

fstab-decode umount -r -d $WEAK_MTPTS

b) Replace this line:

fstab-decode umount -f -v -r -d $WEAK_MTPTS

with

fstab-decode umount -v -r -d $WEAK_MTPTS

7. Reboot the system and it should work.

Tuesday, August 11, 2009

GAE with jtwitter

Considerations:

A. You have active Google App Engine Account.
B. You have already created an application for this project in your Google App Engine Account.
C. You have already downloaded the "jtwitter.jar" from
http://www.winterwell.com/software/jtwitter.php


First add the plug in of GAE in your Eclipse. For that follow the below steps:


A. Open the Eclipse (mine was Eclipse Ganymede).

B. Go to Help -> Software Updates...

C. After opening the "Software Updates and Add-ons" window click on the button "Add Site...".

D. Put the address as per your flavor of Eclipse.

a) Eclipse 3.3 (Europa): http://dl.google.com/eclipse/plugin/3.3

b) Eclipse, for Eclipse 3.4 (Ganymede): http://dl.google.com/eclipse/plugin/3.4

c) Eclipse, for Eclipse 3.5 (Galileo): http://dl.google.com/eclipse/plugin/3.5


E. After clicking "OK" you can see the "Google Plugin for Eclipse" is on the list of "Available Software". Check on the Checkbox and click on the "Install" button.


It will install the plug in in the Eclipse now follow the below steps:


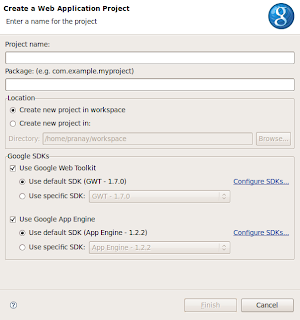
1. Open the Eclipse (mine was Eclipse Ganymede). Then go to File. Under the "File" click on the "New" then click on to the "Web Application Project".

This window will appear:


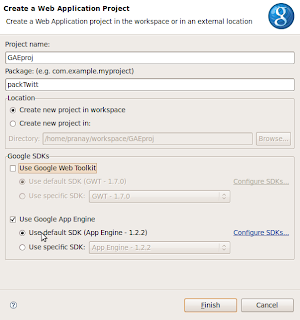
2. Fill up the form as per below screen-shot.


The Project Name is : "GAEproj" and Package is "packTwitt". We are not going to build this project with Google Web Toolkit, so please uncheck the "Use Google Web Toolkit". Also make sure your default SDK for this project is "App Engine". Now click on "Finish".

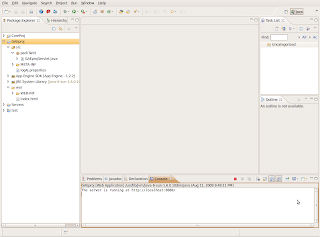
3. You can see the "GAEproj" is on your Package Explorer of Eclipse.

4. Right now we want to test this project at our local server.

5. Select the Project. Click on the "Build Project" under "Project Menu". It will build your project. Now go to "Run" Menu and choose "Run as", then select "Web Application".

6. Look into the console you can see the message "The server is running at http://localhost:8080". (Address may change according to your setting).


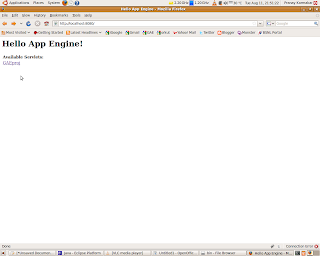
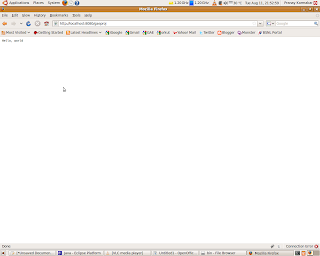
7. Open your browser and type the address mentioned on the console and you can see the below page.


This is the "index.html" file under the /war/WEB-INF/ folder.

8. Now click on the link "GAEproj". You will be navigated to this page which is the servlet "GAEprojServlet.java" under the package "packTwitt".


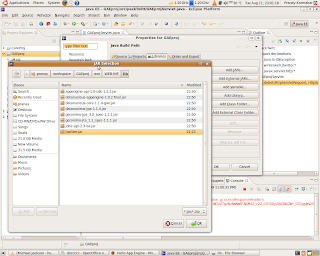
9. You have already downloaded the "jtwitter.jar" from the address http://www.winterwell.com/software/jtwitter.php. We have to add this .jar in our project. For that, select the project "GAEproj", right click on it and click to the "Properties". Select the "Java Build Path" in the left hand side navigation bar. Now click on the "Libraries" tab. Here you can find the button "Add External JARs...". Click on that and select the "jtwitter.jar" from your disk. Now click on "OK". The "jtwitter.jar" file is now included into our project.


10. ok, the project configuration has been done. Now we will move on to the coding section. Open the "index.html" file and modify the code like the below one.


Here, I have introduced a html form with the following properties:
name="ff" (don't ask why), method="POST", action="/gaeproj"

created two text fields one for UserID and another for Password, and finally a Submit button.

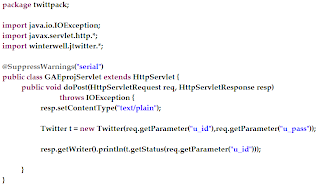
11. Open the "GAEprojServlet.java" file and modify the code like the below one.


Here, first and most important thing is I have changed the "doGet" method to "doPost" method because I have made the form method = "POST" in my "index.html" file. Now import "winterwell.jtwitter.*".

I've made an object 't' like this and pass the userid and password to the constructor.

Twitter t = new Twitter(req.getParameter("u_id"),req.getParameter("u_pass"));

By the method getStatus(String) I've print my last update on Twitter:

resp.getWriter().println(t.getStatus(req.getParameter("u_id")));

12. Build the project and Run. Enter your Twitter UserID and Password and click on "Submit".
You can see the last update in your Twitter account.

NB1: Make sure before login that your profile in Twitter is not Locked.

NB2: Refer the Twitter.class or jTwitter javaDoc for more exiting functions.

13. Its time for deploying the application in your GAE account. For that click on the "Deploy App Engine Project" in Eclipse (Right most icon in the below screen-shot).


An window will appear. Project Name is already there in our case it is "GAEproj". Now type your gmail address and password by which you have created an application in the GAE site.

Click on the "App Engine project settings...". Give the application ID as your application name in GAE site. As it is first time for you Revision should be 1. Click on "OK" and click on "Deploy". It will deploy your application to your GAE account.

Bang!!! Now you can show your own Twitter tricks to the whole world ....

Sunday, August 9, 2009

HOWTO : Setup Java Development Environment on Ubuntu

Packages to be installed: JDK 6, JRE 6, Eclipse (Ganymede – 3.4.2), Tomcat 6

A. Install JDK and JRE:

1. Open the terminal
2. Type sudo apt-get install sun-java6-jdk sun-java6-jre

It will install the JDK and JRE on your system.
Now you can check the version by typing javac -version

3. Set the $JAVA_HOME
export JAVA_HOME="/usr/lib/jvm/java-6-sun-1.6.0.10"


B. Install Eclipse:


1. Download the latest release of the Eclipse (In my case that was Eclipse Ganymede 3.4.2) from eclipse website. http://www.eclipse.org/downloads/packages/release/ganymede/sr2

2. Now extract the .tar.gz in your home directory
tar -xzvf eclipse-jee-ganymede-SR2-linux-gtk.tar.gz

3. To check the Eclipse is opening or not go to the /eclipse directory
cd eclipse

4. Now type the command ./eclipse
The eclipse will open. Now close the eclipse for the time being.


C. Time for Tomcat 6

1. download the copy of Tomcat 6 from apache website http://tomcat.apache.org/download-60.cgi .... it should be a .tar.gz under Core (in my case that was apache-tomcat-6.0.20.tar.gz)

2. Extract the .tar.gz in your home directory
tar -xzvf apache-tomcat-6.0.20.tar.gz

3. Now we have to move it to the /usr/local/tomcat directory. Type this command to do that:
sudo mv apache-tomcat-6.0.20 /usr/local/tomcat

4. Setup Tomcat to Boot on Startup
a) sudo nano /etc/init.d/tomcat

b) Copy and paste this script, making sure to either configure or remove CATALINA_BASE and CATALINA_OPTS:

------------------------------------------------------
#!/bin/bash

export JAVA_HOME=/usr/lib/jvm/java-6-sun
export CATALINA_BASE=/path/to/catalina/base
export CATALINA_OPTS="-server -Xmx512m"
case $1 in
start)
sh /usr/local/tomcat/bin/startup.sh
;;
stop)
sh /usr/local/tomcat/bin/shutdown.sh
;;
restart)
sh /usr/local/tomcat/bin/shutdown.sh
sh /usr/local/tomcat/bin/startup.sh
;;
esac
exit 0

------------------------------------------------------

c) Press Ctrl+X to exit, and answer Yes to save.


5. Now make the above script executable, and install it as a startup script:

sudo chmod 755 /etc/init.d/tomcat
sudo update-rc.d tomcat defaults


6. Type sudo /etc/init.d/tomcat start and your tomcat will be up.


So, your Java Environment is ready to rock with your code!!!!!

Friday, August 7, 2009

Nokia Phone Modem Internet connection in ubuntu

There are two ways to do that:


For newbies:
  • 1. Connect your phone to the PC via USB.
  • 2. Select “PC Suite” in phone.
  • 3. Ubuntu will detect your phone
  • 4. Click on the Configure button and a window will appear, click on “Forward” then you can see names of Mobile Connection Provider. If you can see your Mobile Connection Provider is on the list, select that one. If your Mobile Connection Provider is not on the list (like in my case - AirCel) then select any one of them (I choose AirTel).

NB: If your Mobile Connection Provider is not on the list then please follow the steps from 6 to 10.

  • 5. Click on Finish
  • 6. Go to the Network icon and right click on that and then click on “Configure/Edit Connection”.
  • 7. It will leads you to a window. Go to the "Mobile Broadband" tab and select the Connection name (in my case it was "Airtel") and then Click on "Edit".


  • 8. Then the below screen will appear:
  • 9. Now you have to customize these properties as your Connection Provider. (In my case I changed the APN only).
  • 10. Change the Connection Name as you like. Press “OK”.
  • 11.Now click on the network icon and select the connection name what you have gave.
  • 12. That’s it……. connected!!!
For Terminal Lovers:


  • 1. Connect your phone to the PC via USB.
  • 2. Select “PC Suite” in phone.
  • 3. Go to Terminal
  • 4. type "lsusb"
  • You will get like this:
  • Bus 001 Device 004: ID 0421:00e9 Nokia Mobile Phones
    Bus 001 Device 001: ID 1d6b:0002 Linux Foundation 2.0 root hub
    Bus 005 Device 001: ID 1d6b:0001 Linux Foundation 1.1 root hub
    Bus 004 Device 001: ID 1d6b:0001 Linux Foundation 1.1 root hub
    Bus 003 Device 001: ID 1d6b:0001 Linux Foundation 1.1 root hub
    Bus 002 Device 001: ID 1d6b:0001 Linux Foundation 1.1 root hub
  • 5. sudo /sbin/modprobe usbserial vendor=0x0421 product=0x00e9
  • The Vendor ID and Product ID must match with the result of "lsusb"
  • 4. sudo wvdialconf /etc/wvdial.conf
  • 5.you may find this:
  • ttyS0<*1>: ATQ0 V1 E1 -- failed with 2400 baud, next try: 9600 baud

    ttyS0<*1>: ATQ0 V1 E1 -- failed with 9600 baud, next try: 115200 baud

    ttyS0<*1>: ATQ0 V1 E1 -- and failed too at 115200, giving up.

    Modem Port Scan<*1>: S1 S2 S3

    WvModem<*1>: Cannot get information for serial port.

    ttyACM0<*1>: ATQ0 V1 E1 -- OK

    ttyACM0<*1>: ATQ0 V1 E1 Z -- OK

    ttyACM0<*1>: ATQ0 V1 E1 S0=0 -- OK

    ttyACM0<*1>: ATQ0 V1 E1 S0=0 &C1 -- OK

    ttyACM0<*1>: ATQ0 V1 E1 S0=0 &C1 &D2 -- OK

    ttyACM0<*1>: ATQ0 V1 E1 S0=0 &C1 &D2 +FCLASS=0 -- OK

    ttyACM0<*1>: Modem Identifier: ATI -- Nokia

    ttyACM0<*1>: Speed 4800: AT -- OK

    ttyACM0<*1>: Speed 9600: AT -- OK

    ttyACM0<*1>: Speed 19200: AT -- OK

    ttyACM0<*1>: Speed 38400: AT -- OK

    ttyACM0<*1>: Speed 57600: AT -- OK

    ttyACM0<*1>: Speed 115200: AT -- OK

    ttyACM0<*1>: Speed 230400: AT -- OK

    ttyACM0<*1>: Speed 460800: AT -- OK

    ttyACM0<*1>: Max speed is 460800; that should be safe.

    ttyACM0<*1>: ATQ0 V1 E1 S0=0 &C1 &D2 +FCLASS=0 -- OK


    Found an USB modem on /dev/ttyACM0.

    Modem configuration written to /etc/wvdial.conf.

    ttyACM0: Speed 460800; init "ATQ0 V1 E1 S0=0 &C1 &D2 +FCLASS=0"

  • 6. To see the conf file type "cat /etc/wvdial.conf" and you may find this:
  • [Dialer Defaults]

    Init1 = ATZ

    Init2 = ATQ0 V1 E1 S0=0 &C1 &D2 +FCLASS=0

    Modem Type = USB Modem

    ; Phone =

    ISDN = 0

    ; Password =

    New PPPD = yes

    ; Username =

    Modem = /dev/ttyACM0

    Baud = 460800

  • 7. Now we have to edit this wvdial.conf file according to our Service Provider. I've edited my file just like this:
  • a) uncomment the below line and put target phone no in it like *99#

    ; Phone =

  • Phone = *99#
  • b) uncomment the below line and don't keep it blank, put anything like:

  • ; Password =

  • Password = A
  • c) uncomment the below line and don't keep it blank, put anything like:
  • ; Username =

  • Username = B
  • d) Add the below line:
  • Stupid Mode = 1
  • 8. Type "sudo wvdial" and get connected!!!